Or Cabooses if you prefer. Today's post is all about painting, decaling, and weathering TMMC crummies #90 and #91.
 |
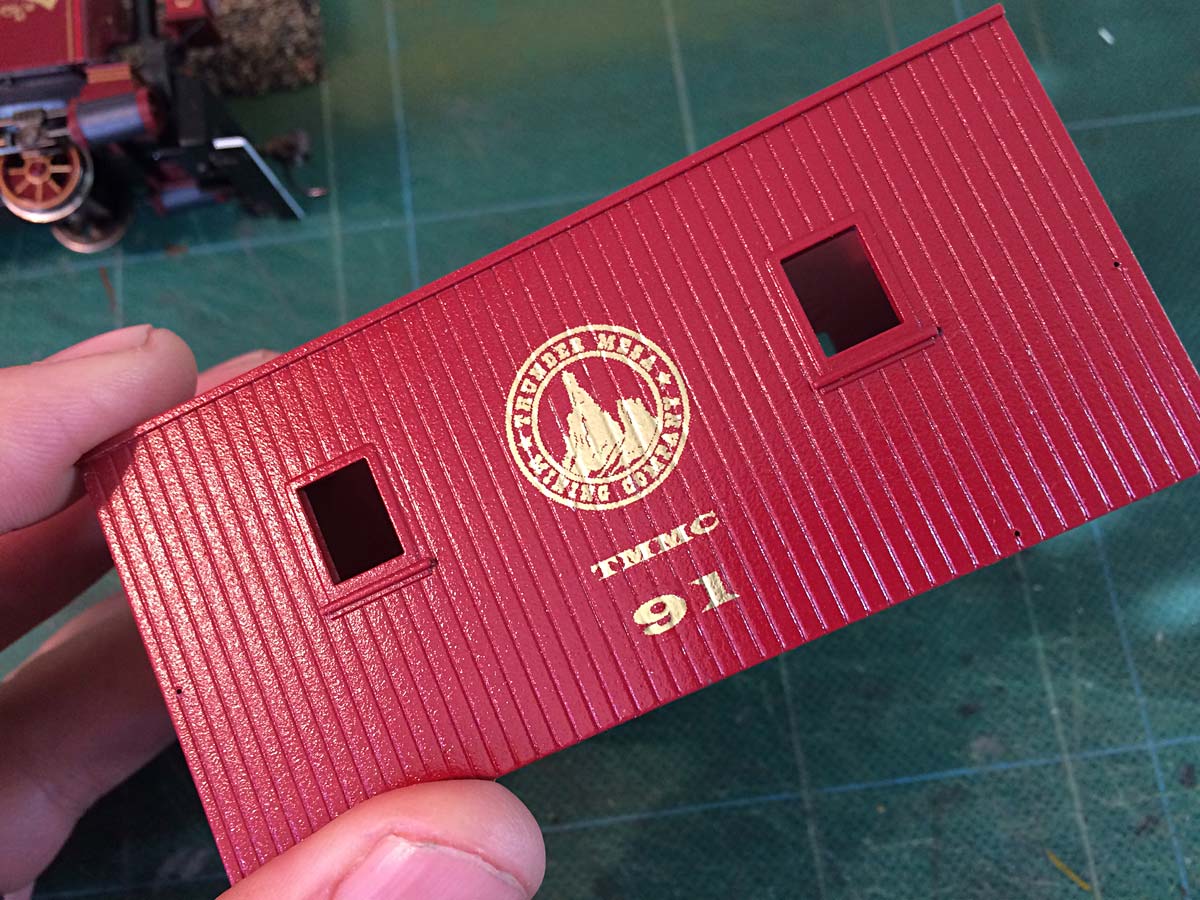
#90 is a drover's caboose and sometimes takes the place of Combine #101, bringing up the rear of the Daily Mixed with passengers and mail. Freshly shopped caboose #91 often travels the branchline up to Big Thunder Camp.
|
Custom Decals
The Thunder Mesa Mining Company is a rather well-to-do little railroad that takes good care of their equipment. To reflect this, I've had some fancy gold decals printed by
Cedarleaf Custom Decals. I supplied Stan Cedarleaf with camera-ready artwork and he printed up the water-slide decals on his ALPS printer. Stan also offers layout and design services for those who can't do their own.
 |
A sheet of Thunder Mesa's custom gold water-slide decals.
|
 |
I liked the Bachmann factory color scheme on the drover's caboose, so I applied the decals to it without further modifications. The red caboose started out as a Bachmann Colorado & Southern short caboose. I removed the original C&S decals with acetone, then disassembled, primed and repainted the caboose with a satin-finish spray enamel called Colonial Red. A smooth satin or gloss finish is always best for applying decals.
|
Applying Decals
 |
There's nothing revolutionary about my decaling techniques, more like "tried-and-true." Getting things properly aligned can be the hardest part so I usually mark locations for decals very lightly in pencil before beginning. Some modelers prefer small scissors for cutting out decals, I usually use a sharp hobby knife. The trick is to cut as close to the edge of design as is practical, thereby eliminating as much of the decal film as you can.
|
 |
I have all of the tools and materials ready before getting any decals wet. A dish of warm water with a couple drops of liquid detergent to improve flow, a soft brush, paper towels, tweezers, a hobby knife and decal setting solutions are a must. The Micro Set helps to stick the decal in place while the Micro Sol is used to soften the decal so it will snug down over details. Both are from Micro-Mark.
|
 |
I pick up small decals by poking them with a hobby knife. Then I dunk them in the warm water for no more than 4 seconds - just enough time to loosen them from the backing paper and activate the adhesive. Then they are laid on a paper towel to soak up the excess water.
|
 |
After wetting the decal, a little Micro Set is brushed onto the area where it will go. The decal is then positioned and very carefully slid off from the backing paper and on to the model. Sorry I couldn't get a picture of that step but it's really as straightforward as it sounds.
|
 |
If the decal is not exactly where I want it, it can be repositioned with a soft brush or even a finger. Care must be taken though not to tear or wrinkle the decal. Yes, I've destroyed more than a couple this way and that's why I always have extras printed on a sheet. Once the decal is in position, I dab on a little Micro Sol to soften it and help it snug into the details. If too much is applied, I dab around the edges with a dry paper towel.
|
 |
It's important to proceed slowly and carefully and not get in a hurry. When doing multiple decals like this, I let each one set up for about an hour before proceeding to the next. Then I let the whole thing dry overnight before tackling the other side. Yes, it can take awhile, but that's why I usually try and decal several models at the same time. That way, I can be working on one car while the other car is drying.
|
Reassembly
 |
After decaling, the caboose was reassembled with new clear acrylic glazing for the windows and repairs made to the interior lighting that had not worked in some time.
|
Watercolor Weathering
 |
Both cabooses were weathered using colored chalks, dry-brushed acrylics and watercolor washes. I wanted the yellow caboose to look as if it hasn't seen the inside of a shop in awhile - a little dirty and faded but still well maintained. The roof is weathered with chalks while the car sides got watercolor washes.
|
 |
Watercolor weathering works particularly well on scribed walls. I mixed up a dark, warm-grey wash with Burnt Sienna and Ultramarine and then applied it generously to the car sides, letting it run and fill the scribe lines between boards. Once it was dry, I went back with a wet brush and washed most of it off, also dabbing here and there with a paper towel. The end result was a grimy look in the corners and crevices, much like this type of equipment gets in the real world.
|
 |
The watercolor washes can be brushed on and washed off again and again to achieve the desired amount of weathering. Individual boards can be picked out with a wet brush and scrubbed "clean" here and there for a varied look as I did here on caboose #90.
|
 |
I wanted caboose #91 to look as if it was recently shopped so I kept the weathering more subtle. I don't usually bother, but the chalks and watercolors can be fixed in place with a light spray of Testor's Dullcoat.
|
Final Thoughts
Both cabooses still need marker lights, figures and other details but they are complete enough to call them done for now. A magazine photo-shoot with a looming deadline was the impetus for getting off my keister and getting them finished and I'm glad that I did. Questions and comments are welcome below. Here's a final shot of caboose #90 from that shoot that wont be used for the magazine. Adios for now, amigos!
 |
Engine #6, on a caboose hop near Lone Rock. I wonder what could be happening on the tracks up ahead to cause the train to stop here?
|


No comments:
Post a Comment